
Ciao, oggi piccolo tutorial su come modificare la pala di una manica per adattarla al giro manica! Hello there, today let’s see how we can modify the sleeve cap and sleeve height to adapt it to the armhole!
Oggi un piccolo tutorial su come modificare la pala di una manica. Prendo ad esempio un cartamodello uscito fine 2018/inizio 2019 al quale ho apportato questa modifica: il vestito Night and Day di Charm Patterns by Gertie.
Today’s the day for a little tutorial on how to modify a sleeve cap and height. Taking as example a pattern a few between you may know, who came out end 2018/beginning 2019: the Night and Day dress by Charm Patterns by Gertie.

Un pò di storia: acquistai il modello cartaceo in prevendita a luglio 2018 per circa 49 dollari e se non mi sbaglio arrivò verso novembre/dicembre. Non so se il modello sia stato modificato/implementato/aggiornato da quel momento, però mi sembra giusto lasciare la mia testimonianza per aiutare chi potesse essere in difficoltà.
Back story: I bought this paper pattern in presale in July 2018 for about 49 dollars and (if I remember it correctly) was delivered November/December. I do not know if the pattern has been updated/changed/improved since the launch in 2018, hopefully, my experience can help someone.
NB: questo tutorial può essere utilizzato per modificare anche altre maniche, non solo questa qui della quale sto parlando.
NB: This tutorial can be used to modify other sleeves too, not just this one particular.
Prima di ricalcare un modello non mio, come prima cosa, misuro tutto il misurabile: circonferenze di seno, vita e fianchi, larghezza spalle, altezza vita davanti e dietro e giri manica con manica.
Before tracing a pattern I haven’t drafted I measure everything: circumferences of bust, waist, hips, shoulders width, front bodice height, back bodice height, armholes, and sleeve cap.
La manica e la sua lentezza – The sleeve and its ease
In linea di massima, la manica per inserirsi nel giro manica di un tessuto fermo deve avere distribuito fra tacca davanti, tacca spalla, tacche dietro almeno 0.6 cm per parte, che può variare 0,7 dietro e 0,5 davanti oppure entrambi 0.6 cm. Più si aggiungo cm di lentezza fra le tacche più la manica sarà da distribuire in maniera uniforme, più il tessuto sarà fermo e il risultato dovrà essere impeccabile.
Usually, a sleeve to fit into a woven armhole should have a difference of ease that starts from 0.6 cm-1/4 up. The ease should be distributed from back notches to front notches, leaving the area on the armpit of the same length you find on the armhole. the more ease you place in between notches, the more you need to gather and the more precise you’ll need to be once sewing.
Numeri e tecnica – Numbers and technique
Due cose: di questo modello volevo ricavare la taglia 14 americana (ecco perchè c’è sottolineata esternamente la taglia 14) e questo modello presenta un margine di cucitura già compreso nel modello di 1.5 cm (per questo c’è una linea interna rosa, che è il modello al netto delle cuciture).
First things first: I wanted to trace a size 14 (that’s why you see traced it) and this pattern has a 1.5 cm-9/16 seam allowance included in the pattern (the rose line is the initial pattern without seam allowance).
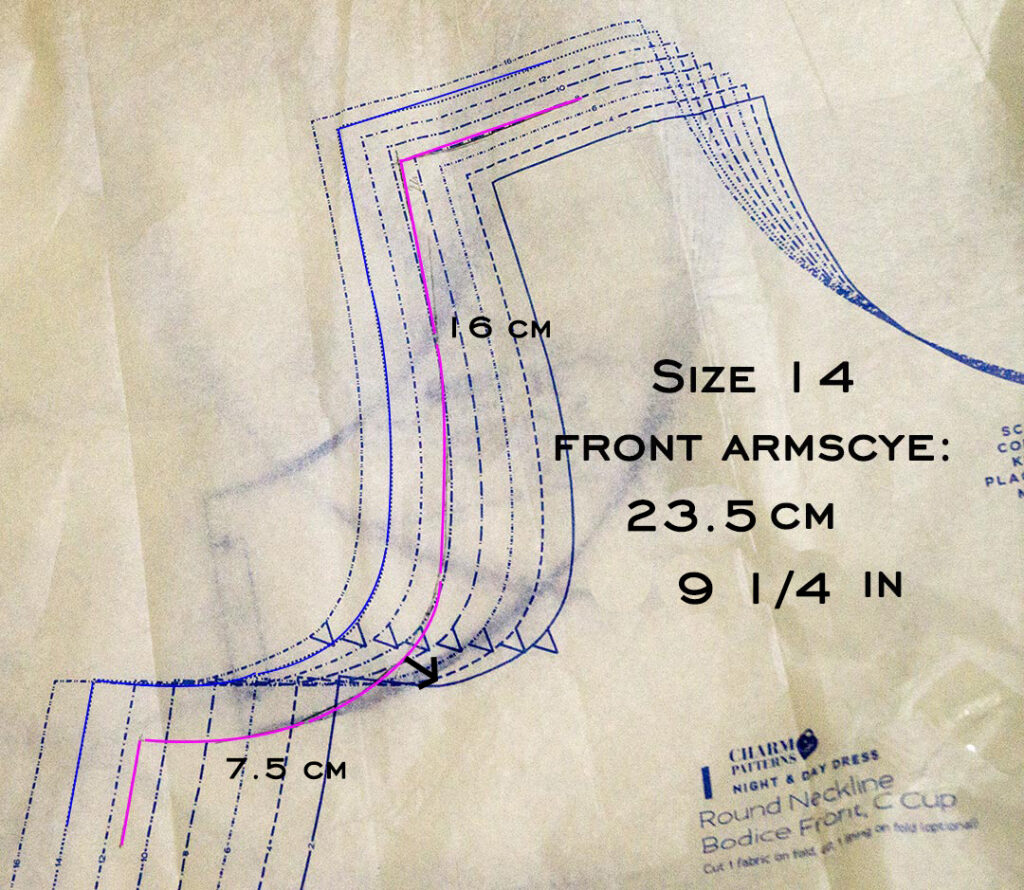
Il giro manica davanti misura 23.5 cm. Front armscye is 23.5 cm-9″ 1/4.
Dall’ascella alla tacca davanti misura 7.5 cm e dalla tacca davanti alla spalla misura 16 cm. From armpit to front notch is 7.5cm-2″ 15/16 and from front notch to shoulder is 16 cm-6″ 5/16.

Il giro manica dietro misura 24.5 cm. Back armscye is 24.5 cm-9″ 5/8.
Dall’ascella alla tacca più lunga dietro misura 9.5 cm e dalla tacca più lunga dietro alla spalla 15 misura cm. From armpit to the longest notch is 9.5 cm-3″ 15/16 and from longest notch to shoulder is 15 cm-5″ 15/16.
Il totale dei due giri manica è di 48 cm. Both armscyes together are 48 cm-18″ 7/8.
La manica – The sleeve
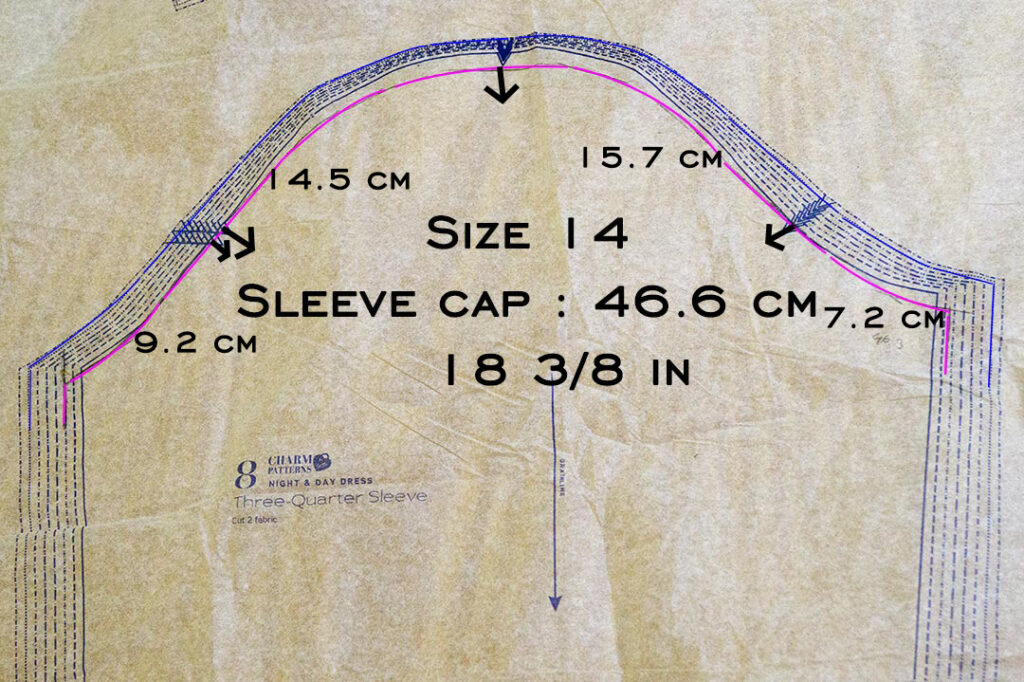
La pala della manica misura 46.6 cm. Sleeve cap is 46.6 cm-18″ 3/8.
Dall’ascella alla tacca davanti misura 7.2 cm, dalla tacca davanti alla tacca di centro spalla misura 15.7 cm, dalla tacca centro spalla alla tacca più lunga dietro misura 14.5 cm e dalla tacca più lunga dietro all’ascella misura 9.2 cm. From armpit to front notch is 7.2 cm-2″ 13/16, from front notch to shoulder notch is 15.7cm -6″ 3/16, from shoulder notch to longest back notch is 14.5cm-5″ 11/16 and from longest back notch to armpit is 9.2cm-3″ 5/8.
Quindi, numeri alla mano: giro manica davanti e dietro 48 cm, pala della manica 46.6 cm. So front and back armhole 48 cm-18″ 7/8 and sleeve cap 18″ 3/8.
Ciò decreta un disavanzo della manica di 1.4 cm rispetto al giro manica. Ciò implica che la manica non entrerà mai nel giro manica, essendo in negativo rispetto allo stesso. This means that sleeve cap is shorter of about 9/16 compared to armholes.
Come fare quindi per modificare la manica senza stravolgerla se mancano cm sulla pala?
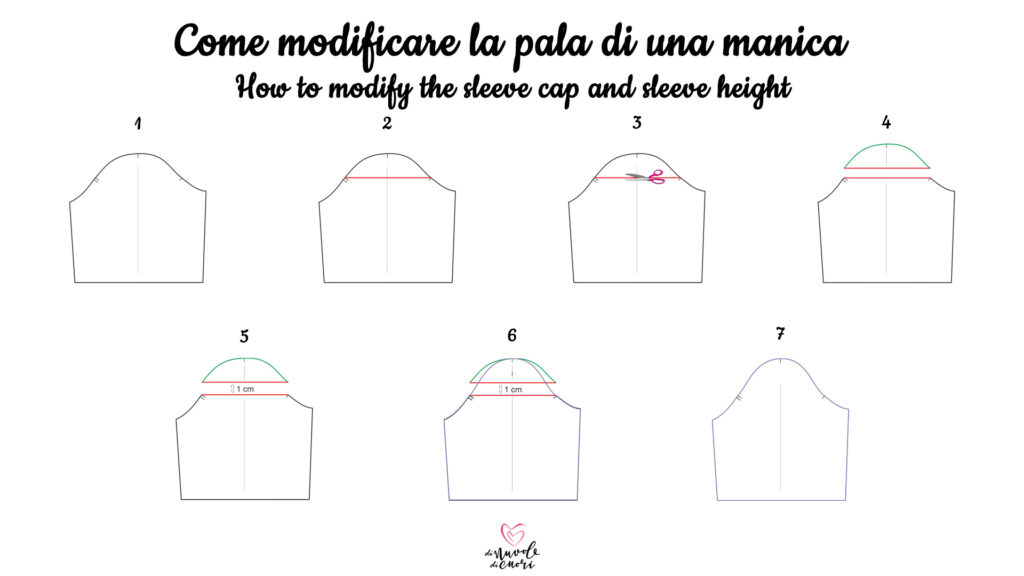
- Prendi la manica che devi modificare.
- Disegna una linea orizzontale da tacche dietro a tacca davanti. Cerca di allungare la linea del dritto filo. Ti servirà per riposizionare il modello dritto e non perdere la sua linearità.
- Taglia sulla linea orizzontale.
- Hai davanti a te la manica tagliata in due, in due pezzi.
- Inserisci un foglio sotto e traccia la linea di dritto filo: posizionerai lì sopra i due pezzi di manica. Scegli di quanto alzare la tua nuova pala. Io ho alzato di 1 cm la pala che vedi in verde. NB: prima di ridisegnare la tua manica, MISURA SEMPRE la nuova pala affinchè i numeri siano quelli che ti servono per farla entrare nel giro.
- Ritraccia la tua pala superiore, mantenendo fisso il punto spalla, addolcendo le due parti, davanti e dietro.
How to modify the sleeve cap without damaging the whole sleeve?
- Take the sleeve you need to modify.
- Draw a horizontal line that goes from front notch to back notches. Extend the grainline. This will help you when placing correctly the pattern once cut.
- Cut on the horizontal line.
- You have the sleeve cut in two parts in front of you.
- Now place a piece of paper under the two pieces and draw a vertical line: this will look like your grainline and you can realign the pattern grainline on it. Choose how much you wish to extend the sleeve cap. I extended 1 cm the sleeve cap you see in green. NB: before redrawing your sleeve cap MEASURE IT so that you are sure about the amount you have added.
- Redraw your sleeve cap. Redraw it starting from the shoulder notch, soften the edges when arriving at the front and back notches.
Spero che questo tutorial sia stato utile, nel caso tu abbia domande sono qua!
Hope this tutorial was helpful, in case you need me, I’m here!

Se stai cercando altri tutorial per imparare a cucire, clicca qui! If you’re looking for some more tutorial to learn to sew, click here!
Ciao, alla prossima, vi aspetto ! See ya!
Se ti va di seguirmi su Instagram o Facebook, mi trovi con il nome DiNuvoleDiCuori!
You can find me on Facebook or Instagram looking for DiNuvoleDiCuori!
Autore

Sarta per passione. Pompelmo rosa e cedrata lover. Benvenut*!