
Iniziamo a cucire il filetto della nostra tasca! Today’s the day for the welt of the welt pockets!
Benvenut*, avanziamo a cucire la gonna a ruota presente su La Mia Boutique di Ottobre 2019 con la prima parte della tasca a filetto!
Welcome back, today’s the day for starting the welt for the welt pocket of the full circle skirt on the La Mia Boutique magazine published in the 2019 October issue!
Qui trovi la prima parte del tutorial e qui la seconda parte con la patta!
Here you find the part of the tutorial and here the second part!
Due note importanti prima di iniziare:
Tutti margini di cucitura che vedrai in questo tutorial sono di 1 cm per le cuciture e 0.7 cm per le impunture. Se preferisci farle diverse, adattale pure a te! Prima di iniziare a cucire, consiglio spassionato per esperienza, arriva fino in fondo al tutorial per saperti regolare con tutti i passaggi ed avere un’idea generale.
Please read this before starting:
All seam allowances in this tutorial are 1 cm and 0.7 cm for topstitching. Feel free to adapt them to you if they don’t suit you! Before starting to sew, a little bit of unwanted advice, read carefully through all of the tutorial, to have a complete idea and know where you’re going.
Prima di staccare i pezzi della gonna dal modello di carta, procedi con due operazioni: 1- taglia con le tacche presenti sul modello, ti serviranno in seguito.
Before separating the skirt from the pattern, accomplish two operations: 1- cut the notches on the pattern, you will need them later .

2- posiziona due spilli alle due estremità del taglio della tasca a filetto segnato sul modello.
2- place two pins at the end of the pocket drawn on the pattern.

Togli il modello e, senza togliere gli spilli, segna sul dritto del tessuto con un gesso una linea da spillo a spillo, dovrebbe risultare di 15 cm.
Remove the pattern and without removing the pins, draw with your chalk a line from pin to pin. It should be 15 cm long.

Aggiungi alle estremità dove è inserito lo spillo 1,5 cm, come in foto.
Add 1,5 cm to both ends where the pins lay, as shown in the photo.

Ripeti l’operazione da entrambe le parti, così:
Repeat the operation on both sides, like that:
Ora aggiungi disegnando 1.5 cm anche ai lati della riga iniziale.
Now add a line 1.5 cm far from the central starting line.

Una volta disegnato le linee parallele, inserisci all’estremità dei 15 cm più 1.5 cm uno spillo da ambo le parti sul dritto del tessuto.
Once drawn the parallel lines, add 1.5 cm at the two ends and place a pin on top of it.

Questi spilli ci servono per calcolare in maniera precisa di quanta teletta termoadesiva di rinforzo abbiamo bisogno. Tagliamone un pezzo alto sui 5 cm.
Those pins are needed to calculate how much interfacing we need to reinforce the welt pocket. Cut a 5 cm wide piece.

Posizioniamo la teletta sul punto dove ci sono gli spilli, lasciando che trasbordi verso l’esterno.
Place the interfacing where the pins are and leave a little bit of interfacing outside of the pins.

Stiriamo la teletta sulla baschina e successivamente togliamo gli spilli.
Press the interfacing and remove the pins.

Prepariamo i filetti: passiamo entrambi alla taglia cuci su tutti e 4 i lati.
Prepare the welts: serge them on all 4 sides.

Inseriamo all’interno il rinforzo per filetti o un pezzo di teletta termoadesiva.
Place the interfacing for the welt pocket inside of it.

Dividi in 3 parti il filetto e segna col gesso a 3 cm la tacca corrispondente.
Divide into 3 parts the welt and trace the 3 cm notch on the right side of the pocket.

Stira il filetto per il lungo.
Press the welt.

Poi piega l’altra parte e ripeti la stiratura.
Bend the other part and repeat the pressing.

Il filetto stirato.
Here’s the pressed welt.

Posiziona sul rovescio della gonna, una tasca a rovescio: devi vedere il dritto.
On the wrong side of the skirt, place a pocket, wrong side to the skirt. You should see the right part.

Sul dritto della baschina, posiziona la patta della tasca con la punta che guarda verso il centro della baschina, non verso il fianco. Posiziona la patta dentro ai 15 cm iniziali. Devono rimanere all’esterno il 1,5 cm che hai aggiunto.
On the right side of the skirt, place the flap with the point looking to the center of the skirt, not to the side. Place the flap inside the starting 15 cm. You shall have 1.5 cm outside the flap traced.

Posiziona il filetto sopra la patta: noterai che è più lungo di 1.5 cm per parte.
Place the welt onto the flap: it has to be longer of 1.5 cm for each side.

Fissa entrambi i filetti e le patte con gli spilli.
Pin both welt and flap.

Prima di passare alla cucitura dei filetti con la macchina da cucire, dato che è un passaggio molto importante, imbastisci a mano entrambe le parti del filetto. Inizia l’imbastitura a mano da prima degli spilli dei 15 cm.
Before sewing with the sewing machine the welt, hand baste both parts of the welt with thread and needle. Start hand basting before the 15 cm pins.

Fai entrambe le parti e lascia pure il filo lungo alla fine.
Baste both sides and leave the thread long.
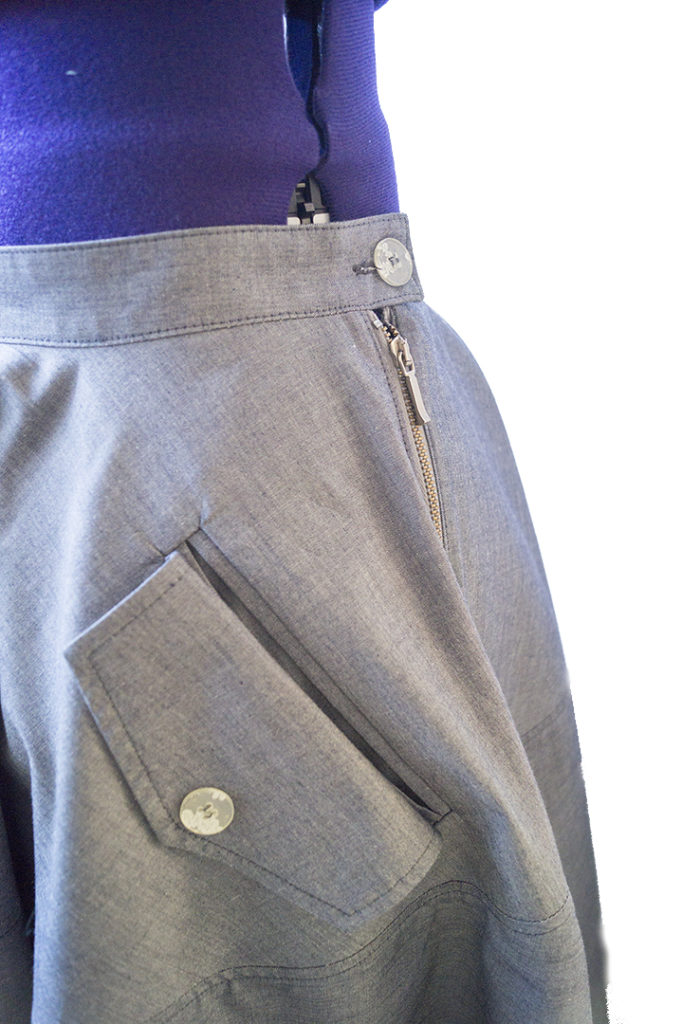
Ed ecco le patte, i filetti e le tasche posizionati sulla nostra baschina.
And here’s how the welts, the flaps, and pockets look like on our skirt.

Con oggi abbiamo terminato, la prossima volta il filetto verrà cucito sulla gonna!
We’re done for today! Next time we will sew the welt!

Ciao, alla prossima, vi aspetto ! See ya!
Se ti va di seguirmi su Instagram o Facebook, mi trovi con il nome DiNuvoleDiCuori!
You can find me on Facebook or Instagram looking for DiNuvoleDiCuori!
Autore

Sarta per passione. Pompelmo rosa e cedrata lover. Benvenut*!