
Ciao, oggi piccolo tutorial su come allungare la manica! Hello there, today let’s see how we can lengthen the sleeve!
Nuovo tutorial su come modificare la manica e ci occupiamo nello specifico di come allungare la manica senza danneggiarla.
Back at pattern modification with a tutorial on how to lengthen a sleeve without damaging it.
Le volte precedenti: qui abbiamo visto come allungarla per adattarla ad un giro manica, qui come accorciarla per farla entrare in un giro manica, qui come come allargarla a livello del bicipite, qui come stringerla a livello del bicipite, qui come accorciarla e oggi vediamo come allungarla.
In the previous posts: here we saw how to lengthen the cap to make it fit the armhole too big, here how to shorten the cap to fit inside an armhole too small, here we saw how to widen the bicep area, here how to tighten the bicep area, here how to shorten it and today we see how to lengthen it.
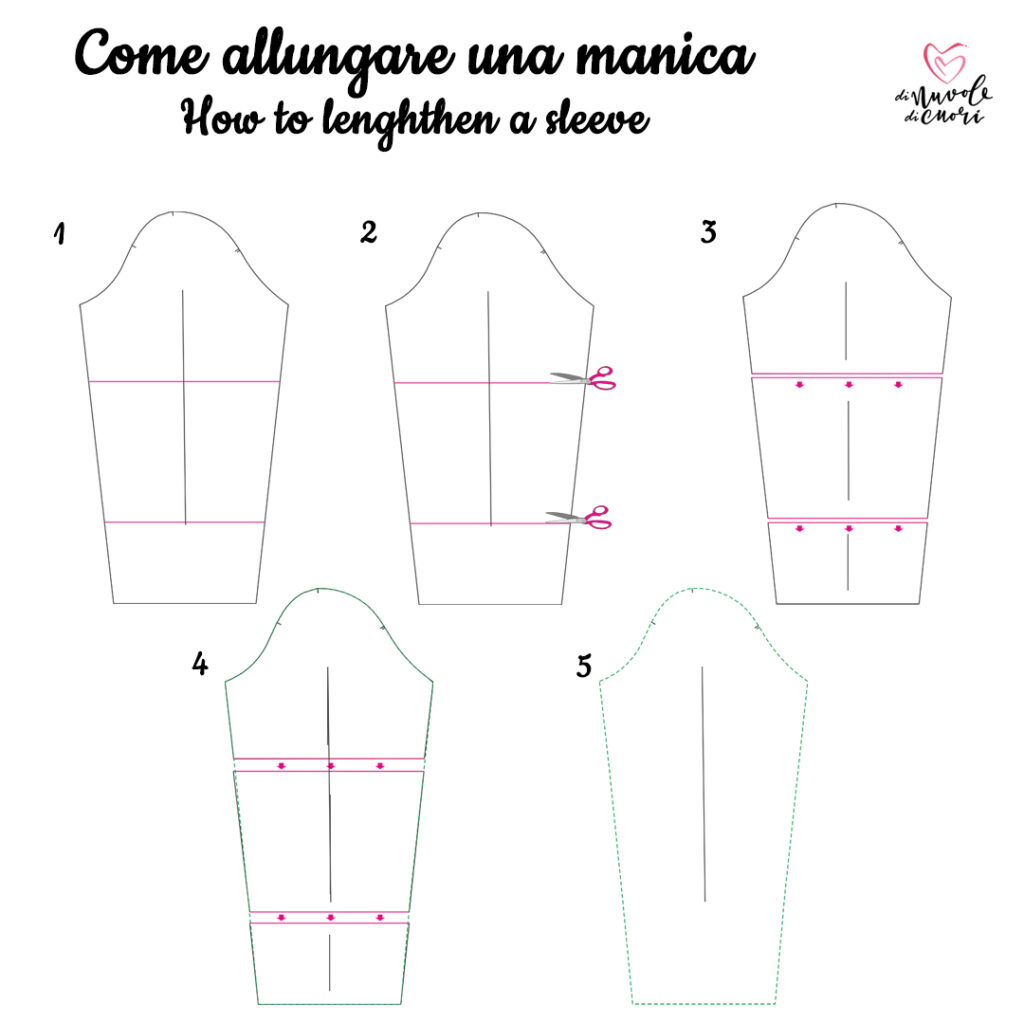
Come allungare la manica senza danneggiarla?
- Prendi la manica che devi modificare e dividi la manica sotto la pala in tre parti. Dividi la tua lunghezza in 3 parti, 1/4, 2/4, 1/4.
- Taglia su tutte le linee che hai tracciato e ricordati di tracciare il dritto filo su ogni parte della manica: ti aiuterà nel momento in cui devi sovrapporre nel punto 3 i vari pezzi.
- Hai davanti a te la manica tagliata: le parti che devono essere mosse sono la parte inferiore e centrale. Fai scivolare lontano la parte inferiore dalla quella centrale e quella centrale dalla parte superiore dell’ammontare che ti serve per allungare la manica (quindi se è 2 cm, fai 1 cm dalla parte inferiore e 1 cm dalla parte centrale e controlla che lo spazio sia equi distante fra i vari pezzi).
- Appoggia un foglio sopra alla manica accorciata modificata e traccia la nuova manica.
- Ecco la tua nuova manica allungata.
How to lengthen the sleeve without damaging it?
- Take the sleeve you need to modify and divide the sleeve under the sleeve cap into 3 parts. Divide the length into 3 parts, 1/4, 2/4, 1/4.
- Cut on all the lines you have drawn and remember to redraw the grainline on each piece.
- You have in front of you the cut sleeve: you need to move far away from each other the lower part and the central part. Divide the lower part from the central part and the central part from the upper part of the amount of space you need to shorten the sleeve (if you need 2 cm, slide 1 cm on the lower part, and 1 cm on the central part).
- Place a piece of paper on the modified sleeve and trace the new sleeve.
- Here’s your new lengthen sleeve.
Spero che questo tutorial sia stato utile, nel caso tu abbia domande sono qua!
Hope this tutorial was helpful, in case you need me, I’m here!

Se stai cercando altri tutorial per imparare a cucire, clicca qui! If you’re looking for some more tutorial to learn to sew, click here!
Ciao, alla prossima, vi aspetto ! See ya!
Se ti va di seguirmi su Instagram o Facebook, mi trovi con il nome DiNuvoleDiCuori!
You can find me on Facebook or Instagram looking for DiNuvoleDiCuori!
Autore

Sarta per passione. Pompelmo rosa e cedrata lover. Benvenut*!